Hunsdon
THE 2899-TON HUNSDON STARTED LIFE as the Arnfried, built in Bremen in 1911 for the Hamburg Amerika Line. At the start of World War One, the Arnfried was captured by the British in German West Africa, and entered British service as the Hunsdon.
The Hunsdon almost survived the war serving the Allied side, being torpedoed just outside Strangford Lough less than a month before the armistice.
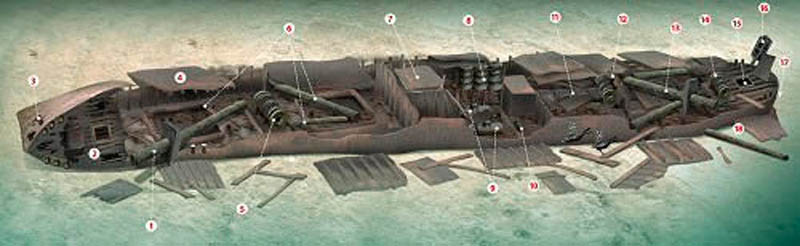
A buoyline is usually tied to the forward mast of the wreck (1), so this is where our tour begins. The mast has fallen across the first hold to leave the top of the mast almost next to the bow (2).
As often happens when a wreck breaks up, the bow has remained relatively intact, but has fallen onto its port side to leave the starboard side uppermost, the shallowest point being 33m. In the centre of the bow deck, a small hatch leads below, though easier access is available through the break. Either side, the wooden deck is beginning to decay and leave holes rotted through.
The anchor-winch is still solidly in place, chains leading down the hawse pipes to the anchors, which are secured against the outside of the bow (3).
Below the bow, the deepest point of the wreck is in a scour to 38m.
Now heading aft, behind the bow, the deck and hold coamings have fallen into the wreck at a depth of about 35m, with deck fittings such as bollards and winches still in place.
Some sections of hull remain upright or even slightly overhanging the deck, particularly on the starboard side (4).
Between the forward holds, by the foot of the fallen mast a single large winch spans the deck (5).
The booms of cargo derricks lie forward and aft across the holds (6).
After the second hold, the wreck rises from the seabed with the bulkhead to the stoke hold (7). Gaps in this bulkhead provide glimpses of the three boilers inside. The wheelhouse would have been located above.
The three boilers provided steam to a triple-expansion engine (8), standing upright and reasonably intact along the centre line of the ship.
The hull to the starboard side has fallen in towards the engine, while on the port side the hull has fallen out to leave the water tanks exposed (9).
To the aft of the engine-room, a reel with water-hose is intact and standing upright on a deck plate (10).
Back on the centre-line, behind the engine the thrust-bearing is enclosed in a big square box, with the propeller-shaft leading aft in a covered tunnel (11).
As with the forward part of the wreck, the deck has collapsed into the two aft holds, though it is considerably more broken, so that the propshaft tunnel is visible most of the way to the stern.
Between the holds, a single cargo winch has tipped forwards, leaving its base vertical and facing aft (12). The corresponding mast (13) has fallen aft and to port, diagonally across the coaming for the aft hold.
A final cargo winch spans the stern deck (14). This would have served the aftmost hold via small derricks and a goalpost mast, now fallen forward and off the port side beneath the main mast.
Like the bow, the stern is decked in wood, with a small hatch in the centre providing access below (15). For wartime service, the Hunsdon was fitted with an "anti-submarine" gun at the stern.
This is tipped over the starboard side , its barrel pointing downwards (16). The bore measures about 4in, and allowing for concretion and rust the calibre could be anything within half an inch of this. I have been unable to find any specification.
Dropping to the seabed and then back beneath the stern, the propeller is still in place (17), though well tangled in a trawl net that has been dragged into the stern. The scour beneath the stern reaches 36m.
While at the seabed, a quick swim round to the port side shows the remains of the goalpost masts and associated derricks that would have served the aft hold (18).
Ascent from here depends on what the current is doing. If it is heading back towards the buoy, a drift along the wreck followed by at least the first part of the ascent back up the buoyline may be easiest, even if a delayed SMB is used for the final part of the ascent.
If it is running in the opposite direction, ascent will be easier using a delayed SMB from the stern.